MongoDb With Asp.Net Core Web API
In this article we will be demonstrating an application using MongoDb with Asp.Net Core. In this open source modern web applications, the use of a NoSQL database is gaining popularity due to its non-relational behaviour. In this demo we will create a Web API using Asp.Net Core which will perform CRUD operations on a collection.
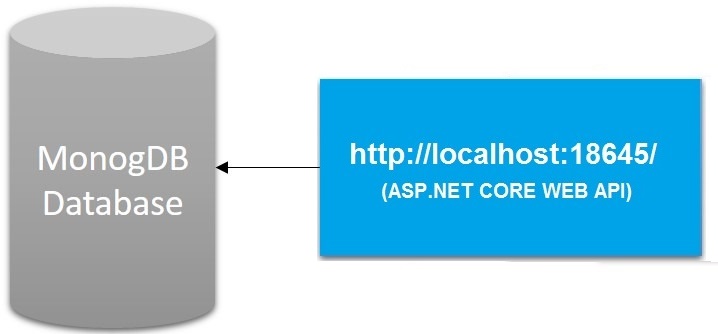
Implementation of Web API & MongoDB:
We will use MongoDb as a database for creating collections and storing documents in it. MongoDB can be downloaded from this link. Install the database and after the completion of installation, the system drive will create a MongoDB folder in the following path.
C:\Program Files\MongoDB
We also need to create a folder where the data will be stored. I have created E:\MongoDb\Data.
Now open the Command Prompt and navigate to the following folder:
![]()
Now run the following command:
![]()
Here e:\MongoDb\Data are the folder path we had created earlier. This will give us this output:
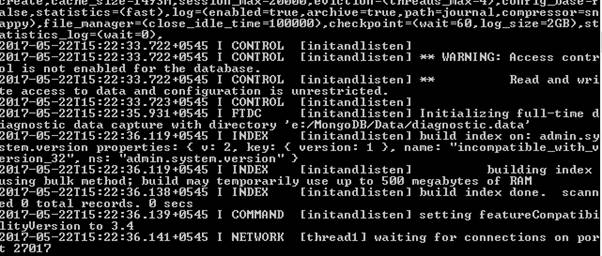
Now we are ready to connect with MongoDB on port 27017.
Now open another instance of Command Prompt and navigate to this:
![]()
This will connect to the default test database. Now run following command:
![]()
This will create a database of name SocialIT if it does not exist already.
Now copy and paste the following code in the console:


This will create user and define the role of the user.
Now let’s demonstrate with the help of project:
Creating ASP.NET CORE WebAPI Project:
- Open Visual Studio 2015 or higher version.
- Click on File >> New Project >>.Net Core.
- Choose Asp.Net Core Web Application (.Net Core).
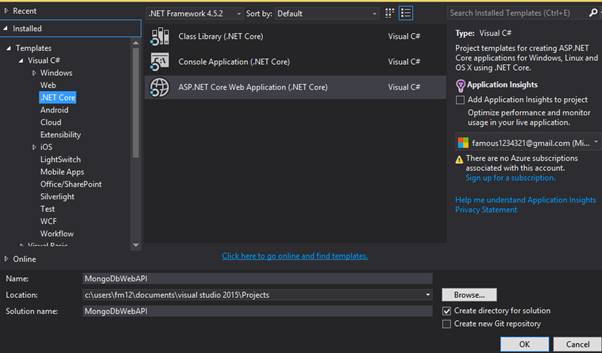
- Provide a suitable name for the project.
- Click on Ok.
- Now choose Web API Template.
- Click on OK.
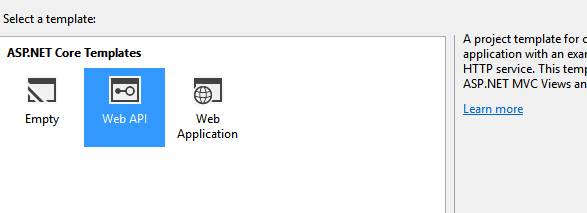
This will create our project. It may take a few seconds.
Configuration:
There are multiple file formats supported out of the box for the configuration i.e. JSON,XML or INI. The WebAPI project template comes with JSON format enabled by default.
Now we provide connection string. Open appsettings.json file and provide the connection string as shown in the code snippet below:

Now to map the custom database connection settings, we will create a class inside Models folder named as ‘Settings.cs’ and add some properties as shown in the code snippet below:

Now we will inject Settings in the Options accessor model in StartUp.cs as shown in the code snippet below:

MongoDB.Net Driver
Now in order to connect to MongoDB, we need to add package named MongoDB.Driver. Go to Nuget Package Manager and install the package.

Creating Model
Let’s create a model named Document and the some properties as shown in the code snippet below:
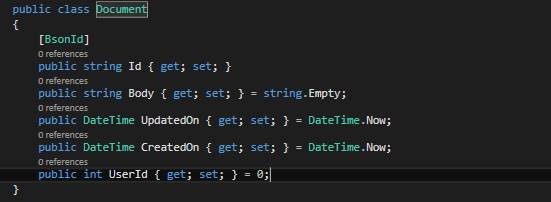
Now after creating model we need to define the database context. For this we will add a class named “DocumentContext”. This will use the Settings defined above.
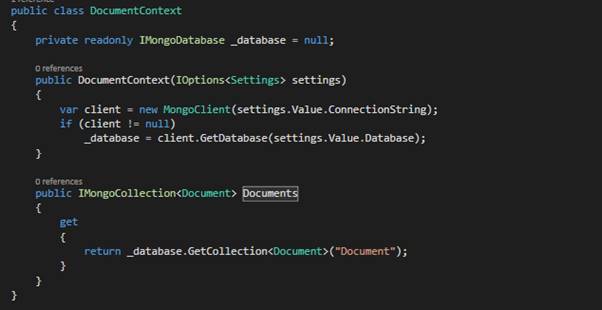
Adding Repository
Using a repository interface, we will implement the functions needed to manage the Notes.
Now let’s first create an Interface.
- Create a folder called Repositories.
- Right click Repositories folder => Add New Item
- Choose Interface and provide name
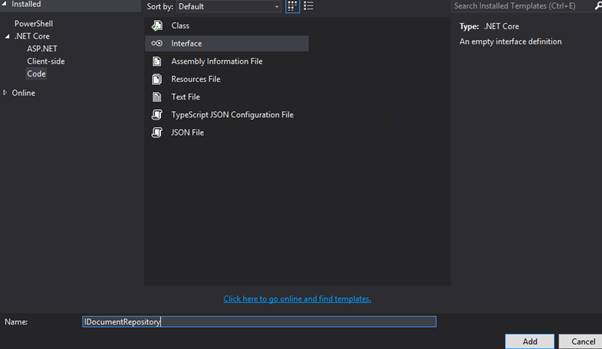
Now let’s add some code in newly created Interface as shown in the code snippet below:
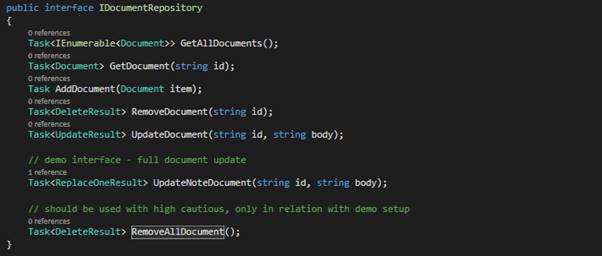
Use the appropriate namespace by pressing Ctrl + ‘.’ On the errors and do no t forget to make interface public.
Now let’s create another class in Repositories folder and name it as “DocumentRepository” and add code as shown in the code snippet below:
public class DocumentRepository : IDocumentRepository
    {
        private readonly DocumentContext _context = null;
        public DocumentRepository(IOptions<Settings> settings)
        {
            _context = new DocumentContext(settings);
        }
        public async Task<IEnumerable<Document>> GetAllDocuments()
        {
            return await _context.Documents.Find(_ => true).ToListAsync();
        }

        public async Task<Document> GetDocument(string id)
        {
            var filter = Builders<Document>.Filter.Eq("Id", id);
            return await _context.Documents
                                 .Find(filter)
                                 .FirstOrDefaultAsync();
        }

        public async Task AddDocument(Document item)
        {
            await _context.Documents.InsertOneAsync(item);
        }

        public async Task<DeleteResult> RemoveDocument(string id)
        {
            return await _context.Documents.DeleteOneAsync(
                         Builders<Document>.Filter.Eq("Id", id));
        }

        public async Task<UpdateResult> UpdateDocument(string id, string body)
        {
            var filter = Builders<Document>.Filter.Eq(s => s.Id, id);
            var update = Builders<Document>.Update
                                .Set(s => s.Body, body)
                                .CurrentDate(s => s.UpdatedOn);
            return await _context.Documents.UpdateOneAsync(filter, update);
        }

        public async Task<ReplaceOneResult> UpdateNoteDocument(string id, Document item)
        {
            return await _context.Documents
                                 .ReplaceOneAsync(n => n.Id.Equals(id)
                                                     , item
                                                     , new UpdateOptions { IsUpsert = true });
        }

        public async Task<DeleteResult> RemoveAllDocument()
        {
            return await _context.Documents.DeleteManyAsync(new BsonDocument());
        }
    }
Now in order to access DocumentRepository using DI model, we add code in ConfigureServices:

Adding Controller
Now to provide all the CRUD interfaces, we create a controller and name it as DocumentController.
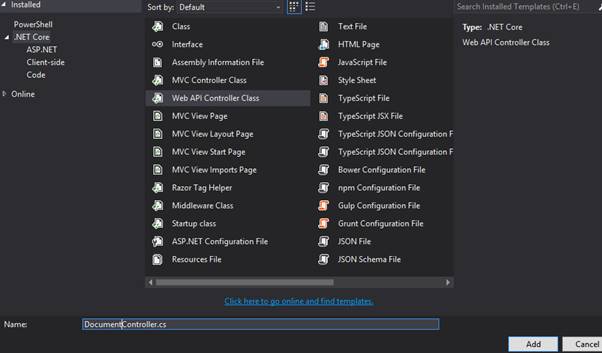
And add codes in it as shown in the code snippet below:
[Route("api/[controller]")]
    public class DocumentController : Controller
    {
        private readonly IDocumentRepository _documentRepository;

        public DocumentController(IDocumentRepository documenttRepository)
        {
            _documentRepository = documenttRepository;
        }
        // GET: notes/notes
        [HttpGet]
        public Task<string> Get()
        {
            return GetDocumnetInternal();
        }
        private async Task<string> GetDocumnetInternal()
        {
            var notes = await _documentRepository.GetAllDocuments();
            return JsonConvert.SerializeObject(notes);
        }

        // GET api/notes/5
        [HttpGet("{id}")]
        public Task<string> Get(string id)
        {
            return GetDocumentByIdInternal(id);
        }

        private async Task<string> GetDocumentByIdInternal(string id)
        {
            var note = await _documentRepository.GetDocument(id) ?? new Models.Document();
            return JsonConvert.SerializeObject(note);
        }

        // POST api/notes
        [HttpPost]
        public void Post([FromBody]string value)
        {
            _documentRepository.AddDocument(new Models.Document() { Body = value, CreatedOn = DateTime.Now, UpdatedOn = DateTime.Now });
        }

        // PUT api/notes/5
        [HttpPut("{id}")]
        public void Put(string id, [FromBody]string value)
        {
            _documentRepository.UpdateDocument(id, value);
        }

        // DELETE api/notes/5
        public void Delete(string id)
        {
            _documentRepository.RemoveDocument(id);
        }
    }
}
Now we need to add another WebAPI Controller and name it as ‘SystemController’. This controller will be a controller dedicated to administrative tasks. And add the codes as shown in the code snippet below:
[Route("api/[controller]")]
    public class SystemController : Controller
    {
        private readonly IDocumentRepository _documnetRepository;

        public SystemController(IDocumentRepository documentRepository)
        {
            _documnetRepository = documentRepository;
        }

        // Call an initialization - api/system/init
        [HttpGet("{setting}")]
        public string Get(string setting)
        {
            if (setting == "init")
            {
                _documnetRepository.RemoveAllDocument();
                _documnetRepository.AddDocument(new Models.Document()
                {
                    Id = "1",
                    Body = "Test Document 1",
                    CreatedOn = DateTime.Now,
                    UpdatedOn = DateTime.Now,
                    UserId = 1
                });
                _documnetRepository.AddDocument(new Models.Document()
                {
                    Id = "2",
                    Body = "Test Document 2",
                    CreatedOn = DateTime.Now,
                    UpdatedOn = DateTime.Now,
                    UserId = 1
                });
                _documnetRepository.AddDocument(new Models.Document()
                {
                    Id = "3",
                    Body = "Test Document 3",
                    CreatedOn = DateTime.Now,
                    UpdatedOn = DateTime.Now,
                    UserId = 2
                });
                _documnetRepository.AddDocument(new Models.Document()
                {
                    Id = "4",
                    Body = "Test Document 4",
                    CreatedOn = DateTime.Now,
                    UpdatedOn = DateTime.Now,
                    UserId = 2
                });

                return "Done";
            }

            return "Unknown";
        }
    }
Now run the application and navigate to http://localhost:18645/api/system/init. This will store the data in the database:

And then again navigate to http://localhost:18645/api/Document we will see the following output:

