Database Connection with POSTGRESQL Using Entity Framework
In this article we will demonstrate database connection with Postgresql using entity framework. So, let’s get started.
PostgreSQL:
PostgreSQL simply called Postgers is an object-relational database i.e. a RDBMS with additional “object” features with an emphasis on extensibility and standards compliance. As a database server, its primary functions are to store data securely and return that data in response to requests from other software applications. It can handle workloads ranging from small single- machine applications to large Intenet-facing applications with many concurrent users on MacOS Server. PostreSQL is the default database and it is also available for Microsoft windows and linux.
PostgreSQL is ACID-compliant and transactional. PostgreSQL has updatable views and materialized views, triggers, foreign keys, supports functions and stored procedures and other expandability.
PostgreSQL is developed by the PostSQL Global Development Group, adiverse group of many companies and individual contributors. It is free and open source software released under the terms of the PostgreSQL License, a permissive free-software released under the terms of the PostgreSQL License, a permissive free software license.
Now Let’s demonstrate with an application. Creating Web Application:
- Open Visual Studio 2015 Update 3 or Higher version
- File >> New Project
- Choose Asp.Net Core Web Application
- Provide a suitable name for the project
- Click on Ok.
- Choose Web Application from the Template
- Click Ok
This will create our application and it will take a few seconds.
Now first lets add the required packages to the project.json file where all dependencies are stored. Our package should look like this where all required package is installed.
{
  "dependencies": {
    "Microsoft.NETCore.App": {
      "version": "1.0.0",
      "type": "platform"
    },
    "Microsoft.AspNetCore.Mvc": "1.0.0",
    "Microsoft.AspNetCore.Server.IISIntegration": "1.0.0",
    "Microsoft.AspNetCore.Server.Kestrel": "1.0.0",
    "Microsoft.Extensions.Configuration.EnvironmentVariables": "1.0.0",
    "Microsoft.Extensions.Configuration.UserSecrets": "1.0.0",
    "Microsoft.Extensions.Configuration.FileExtensions": "1.0.0",
    "Microsoft.Extensions.Configuration.Json": "1.0.0",
    "Microsoft.Extensions.Logging": "1.0.0",
    "Microsoft.Extensions.Logging.Console": "1.0.0",
    "Microsoft.Extensions.Logging.Debug": "1.0.0",
    "Npgsql.EntityFrameworkCore.PostgreSQL": "1.0.0",
    "Microsoft.EntityFrameworkCore.Design": "1.0.0-preview2-final"
  },

  "tools": {
    "Microsoft.AspNetCore.Server.IISIntegration.Tools": {
      "version": "1.0.0-preview2-final",
      "imports": "portable-net45+win8+dnxcore50"
    },
    "Microsoft.Extensions.SecretManager.Tools": "1.0.0-preview2-final",
    "Microsoft.EntityFrameworkCore.Tools": {
        "version": "1.0.0-preview2-final",
        "imports": "portable-net45+win8+dnxcore50"
    }
  },

  "frameworks": {
    "netcoreapp1.0": {
      "imports": [
        "dotnet5.6",
        "dnxcore50",
        "portable-net45+win8"
      ]
    }
  },

  "buildOptions": {
    "emitEntryPoint": true,
    "preserveCompilationContext": true
  },

  "runtimeOptions": {
    "gcServer": true
  },

  "publishOptions": {
    "include": [
      "wwwroot",
      "Views",
      "appsettings.json",
      "web.config"
    ]
  },

  "scripts": {
    "postpublish": [ "dotnet publish-iis --publish-folder %publish:OutputPath% --framework %publish:FullTargetFramework%" ]
  },

  "tooling": {
    "defaultNamespace": "AddingEFCoreOnOSX"
  },

  "userSecretsId": "adding-ef-core-on-osx"
}
Creating Model:
Now let’s create a folder named “Model”. Inside this folder let us create a class called Article.cs and add the properties to it as shown in the code snippet below:
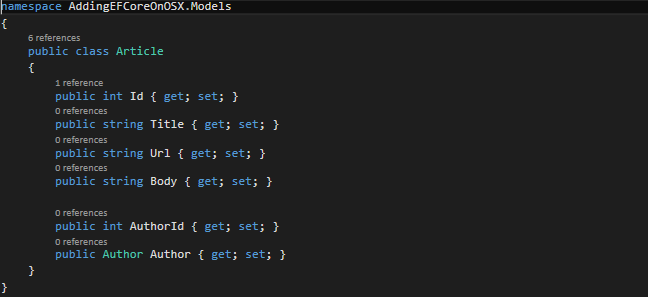
Lets another class in the same folder and name it as “Author.cs” and add some properties as shown in the code snippet below:

Again create another model and name it as “ArticleContext.cs” and add the properties as shown in the code snippet:

Now let’s add connection string to our project.
ConnectionString:
Open appsettings and provide the connectionstring here as shown in the code snippet below:

Now let’s configure our startup.cs to get the connectionstring we have just created. Go to startup.cs and add some code in the ConfigureServices method as shown in the code snippet below:

Generate Migrations Using EntityFramework Tools
Now we have our instance of PostgreSQl started and our models built,we can use the EF Core Tools to scaffold our migrations and update our database. We would typically run entity framework migration code from the Packeage Manager Console. However now we have the dot net CLI with the help of which we are able to hool into the command support and run our migrations directly on the command line.
Now lets open the command line and lets navigate to the root of our running project. In my case it is:
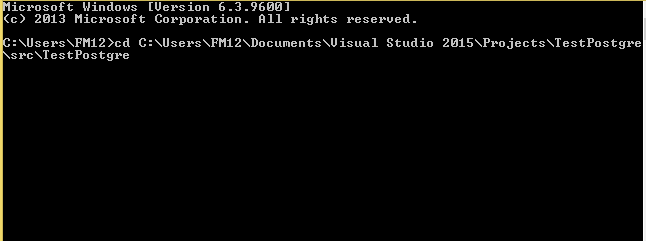
Now we add our first migration and provide a descriptive name as FirstMigration, you can give any name you want. To add migration the command is “dotnet ef migrations add FirstMigration”
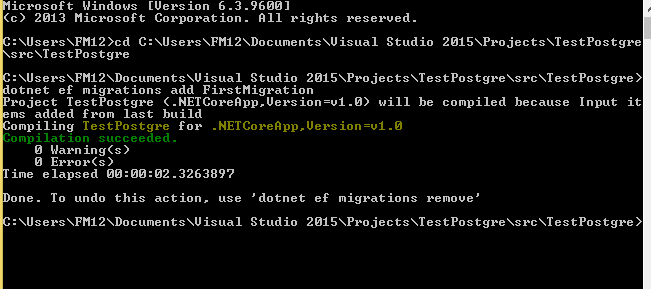
We can go to our Visual Studio and see that the folder name “Migrations” is added to our project with two classes. If we want to remove the migrations then hi this command in command promopt: dotnet ef migrations remove.
But we have not yet updated the database. To update the database write this command to the command Prompt “dotnet ef database update”.

Now open postgresql i.e. pgAdmin 4 and the database has been updated with name that we had provide in the connectionstring in appsettings.json file.
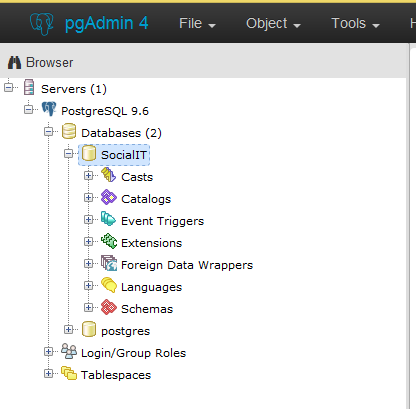
We can see the tables are also been created under the Schemas tab with the properties that we have specified in our model.
Now Injecting DbContext Into MVC Controllers
We have configured both our app and our database. Now lets put them in to use. Lets create WebAPI Controllers to allow GET and POST methods in Author and Article classes. To hook this up to the database, we inject an instance of our ArticlesContext to use for querying and updates.
Now let’s create WebAPIController.
- Right click in Controllers folder.
- Add New Item.
- Choose WebAPI Controller class and provide name “AuthorsController”
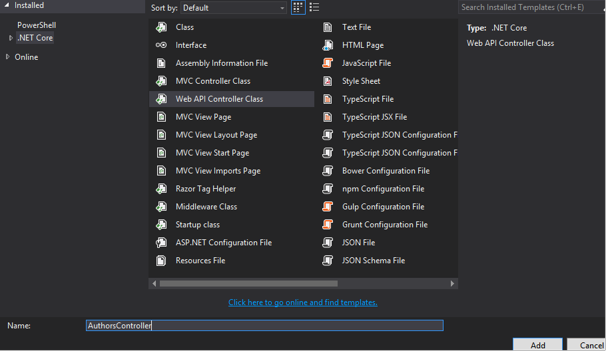
- Click Add.
Now let’s add some code in it as shown in the code snippet below:
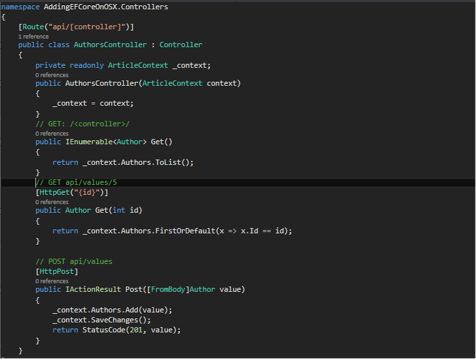
This is a simple controller. Now let’s test this with the help of PostMan. PostMan is a software which helps you build, test and document APIs faster.
Notice that your project must be running run the test in Postman.


We can see the output in the browser too just navigate to api/Authors.

Similarly we can do it for Article class that we had created in earlier. Hope you enjoyed this article.
